> ## Documentation Index
> Fetch the complete documentation index at: https://docs.wisepim.com/llms.txt
> Use this file to discover all available pages before exploring further.
# Product Lifecycle
> Define the stages products move through, from draft to published. Give your team a clear view of what is done and what still needs work.
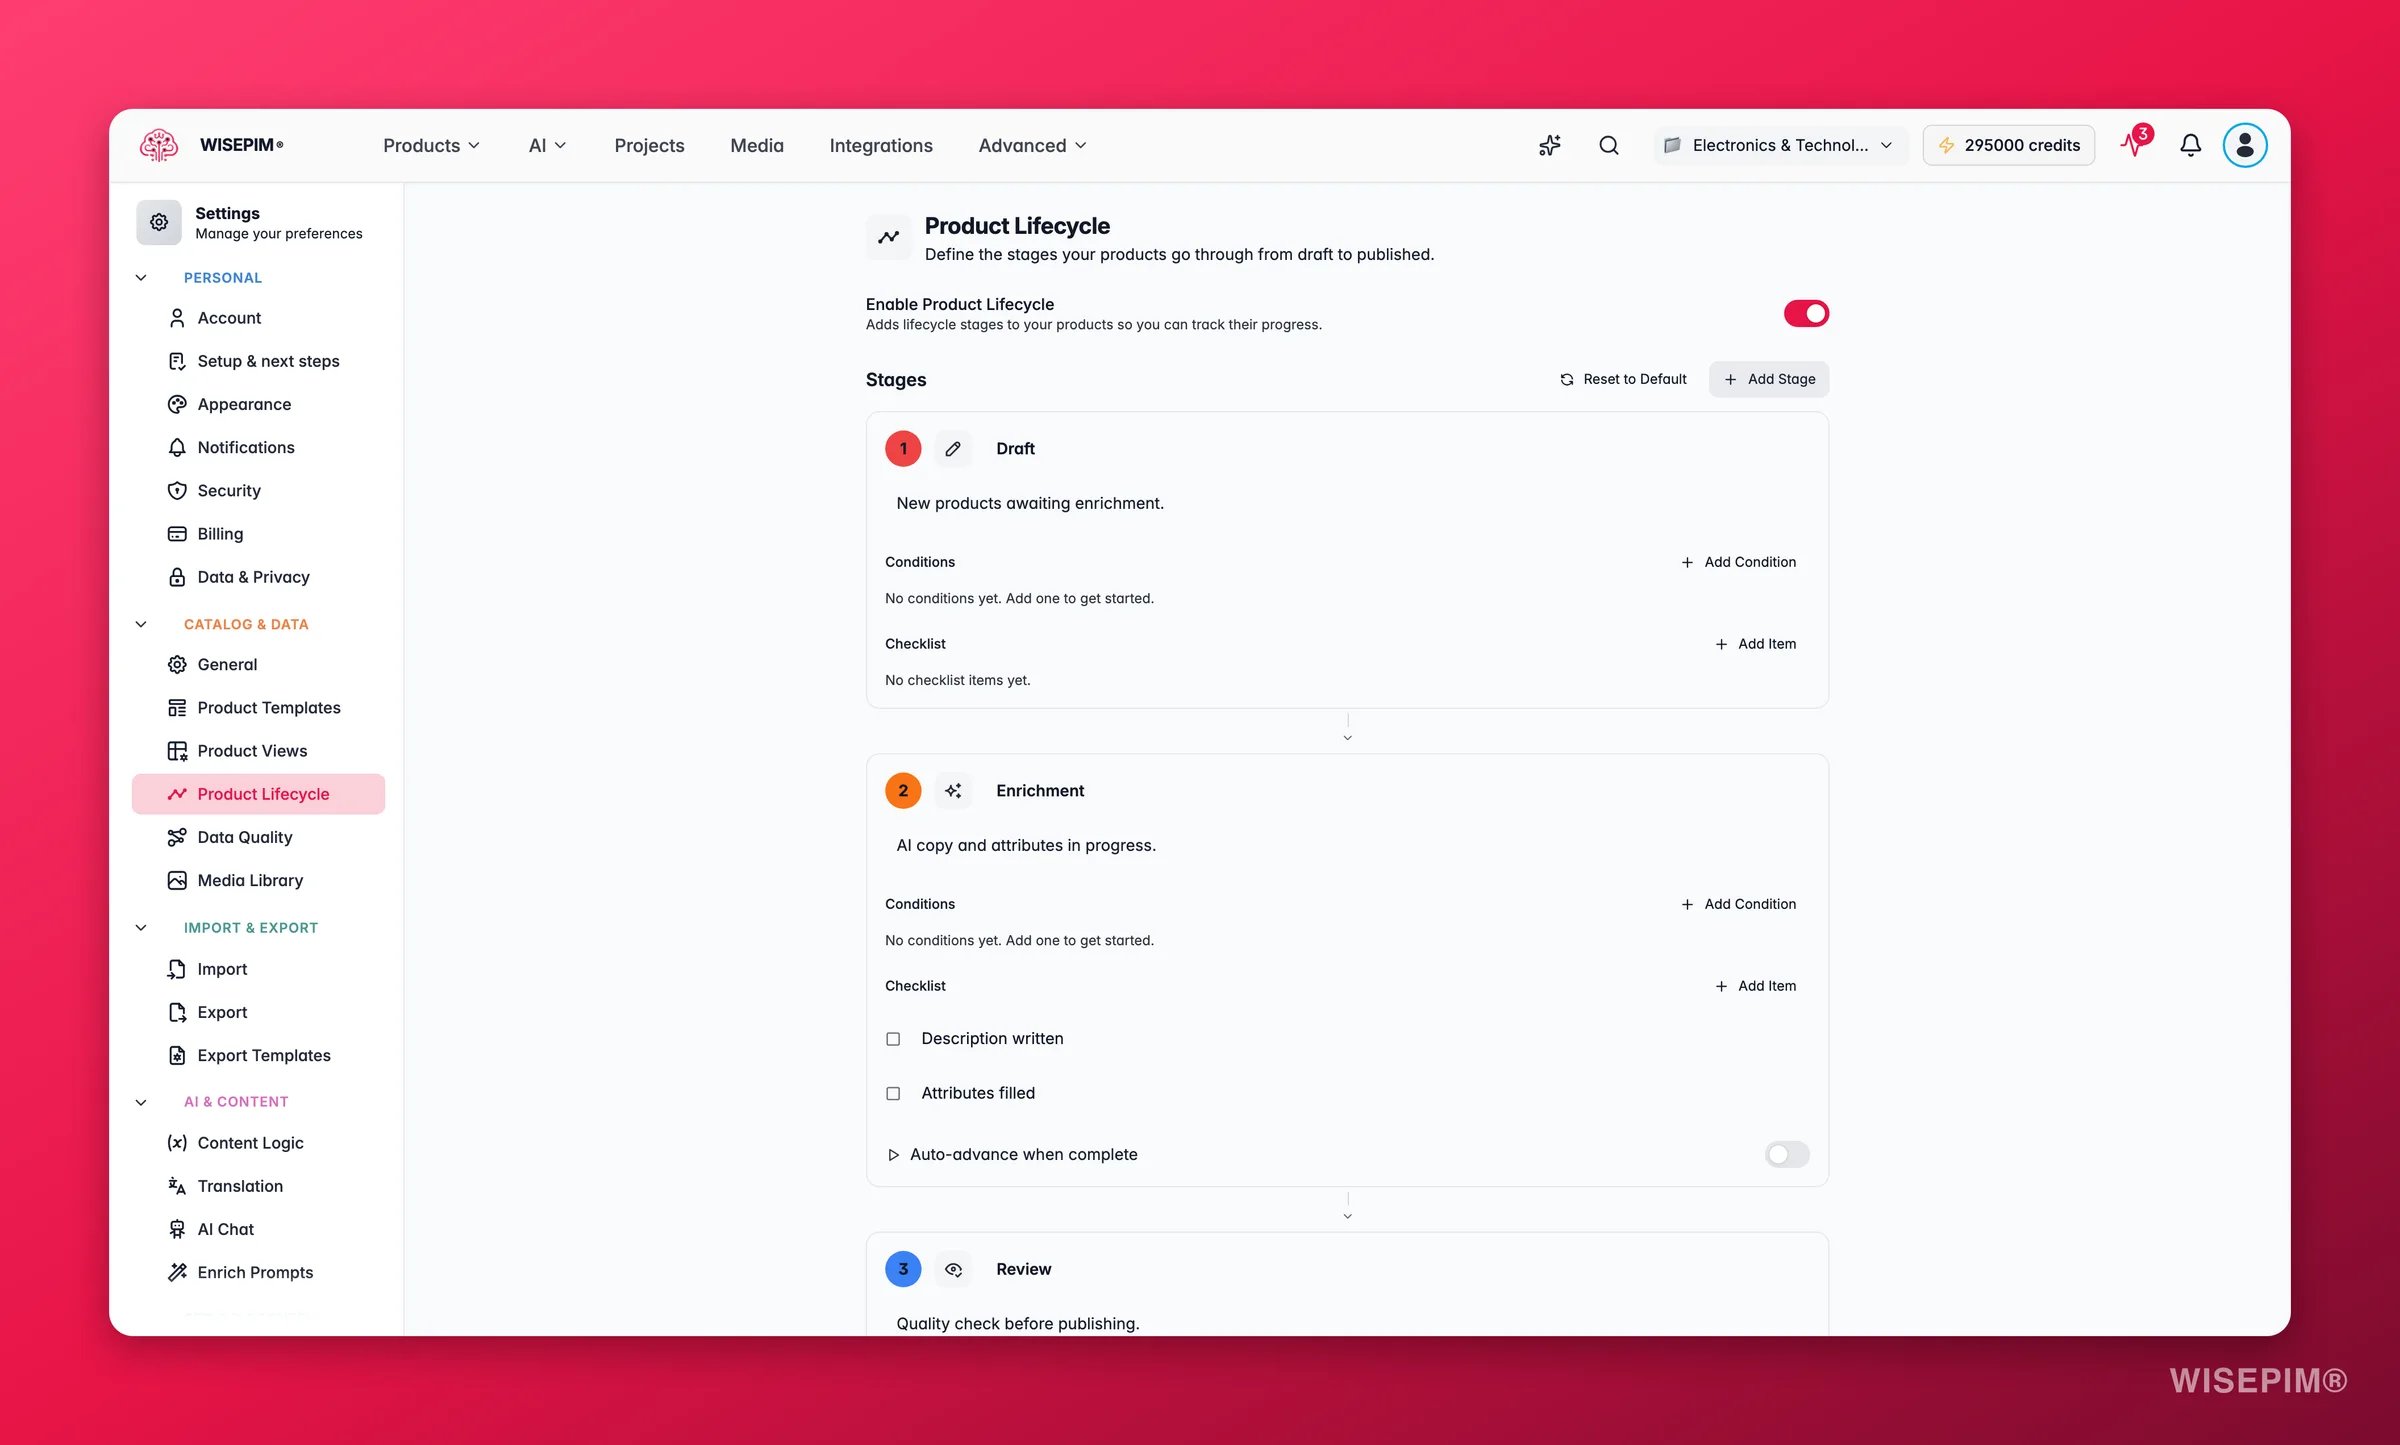
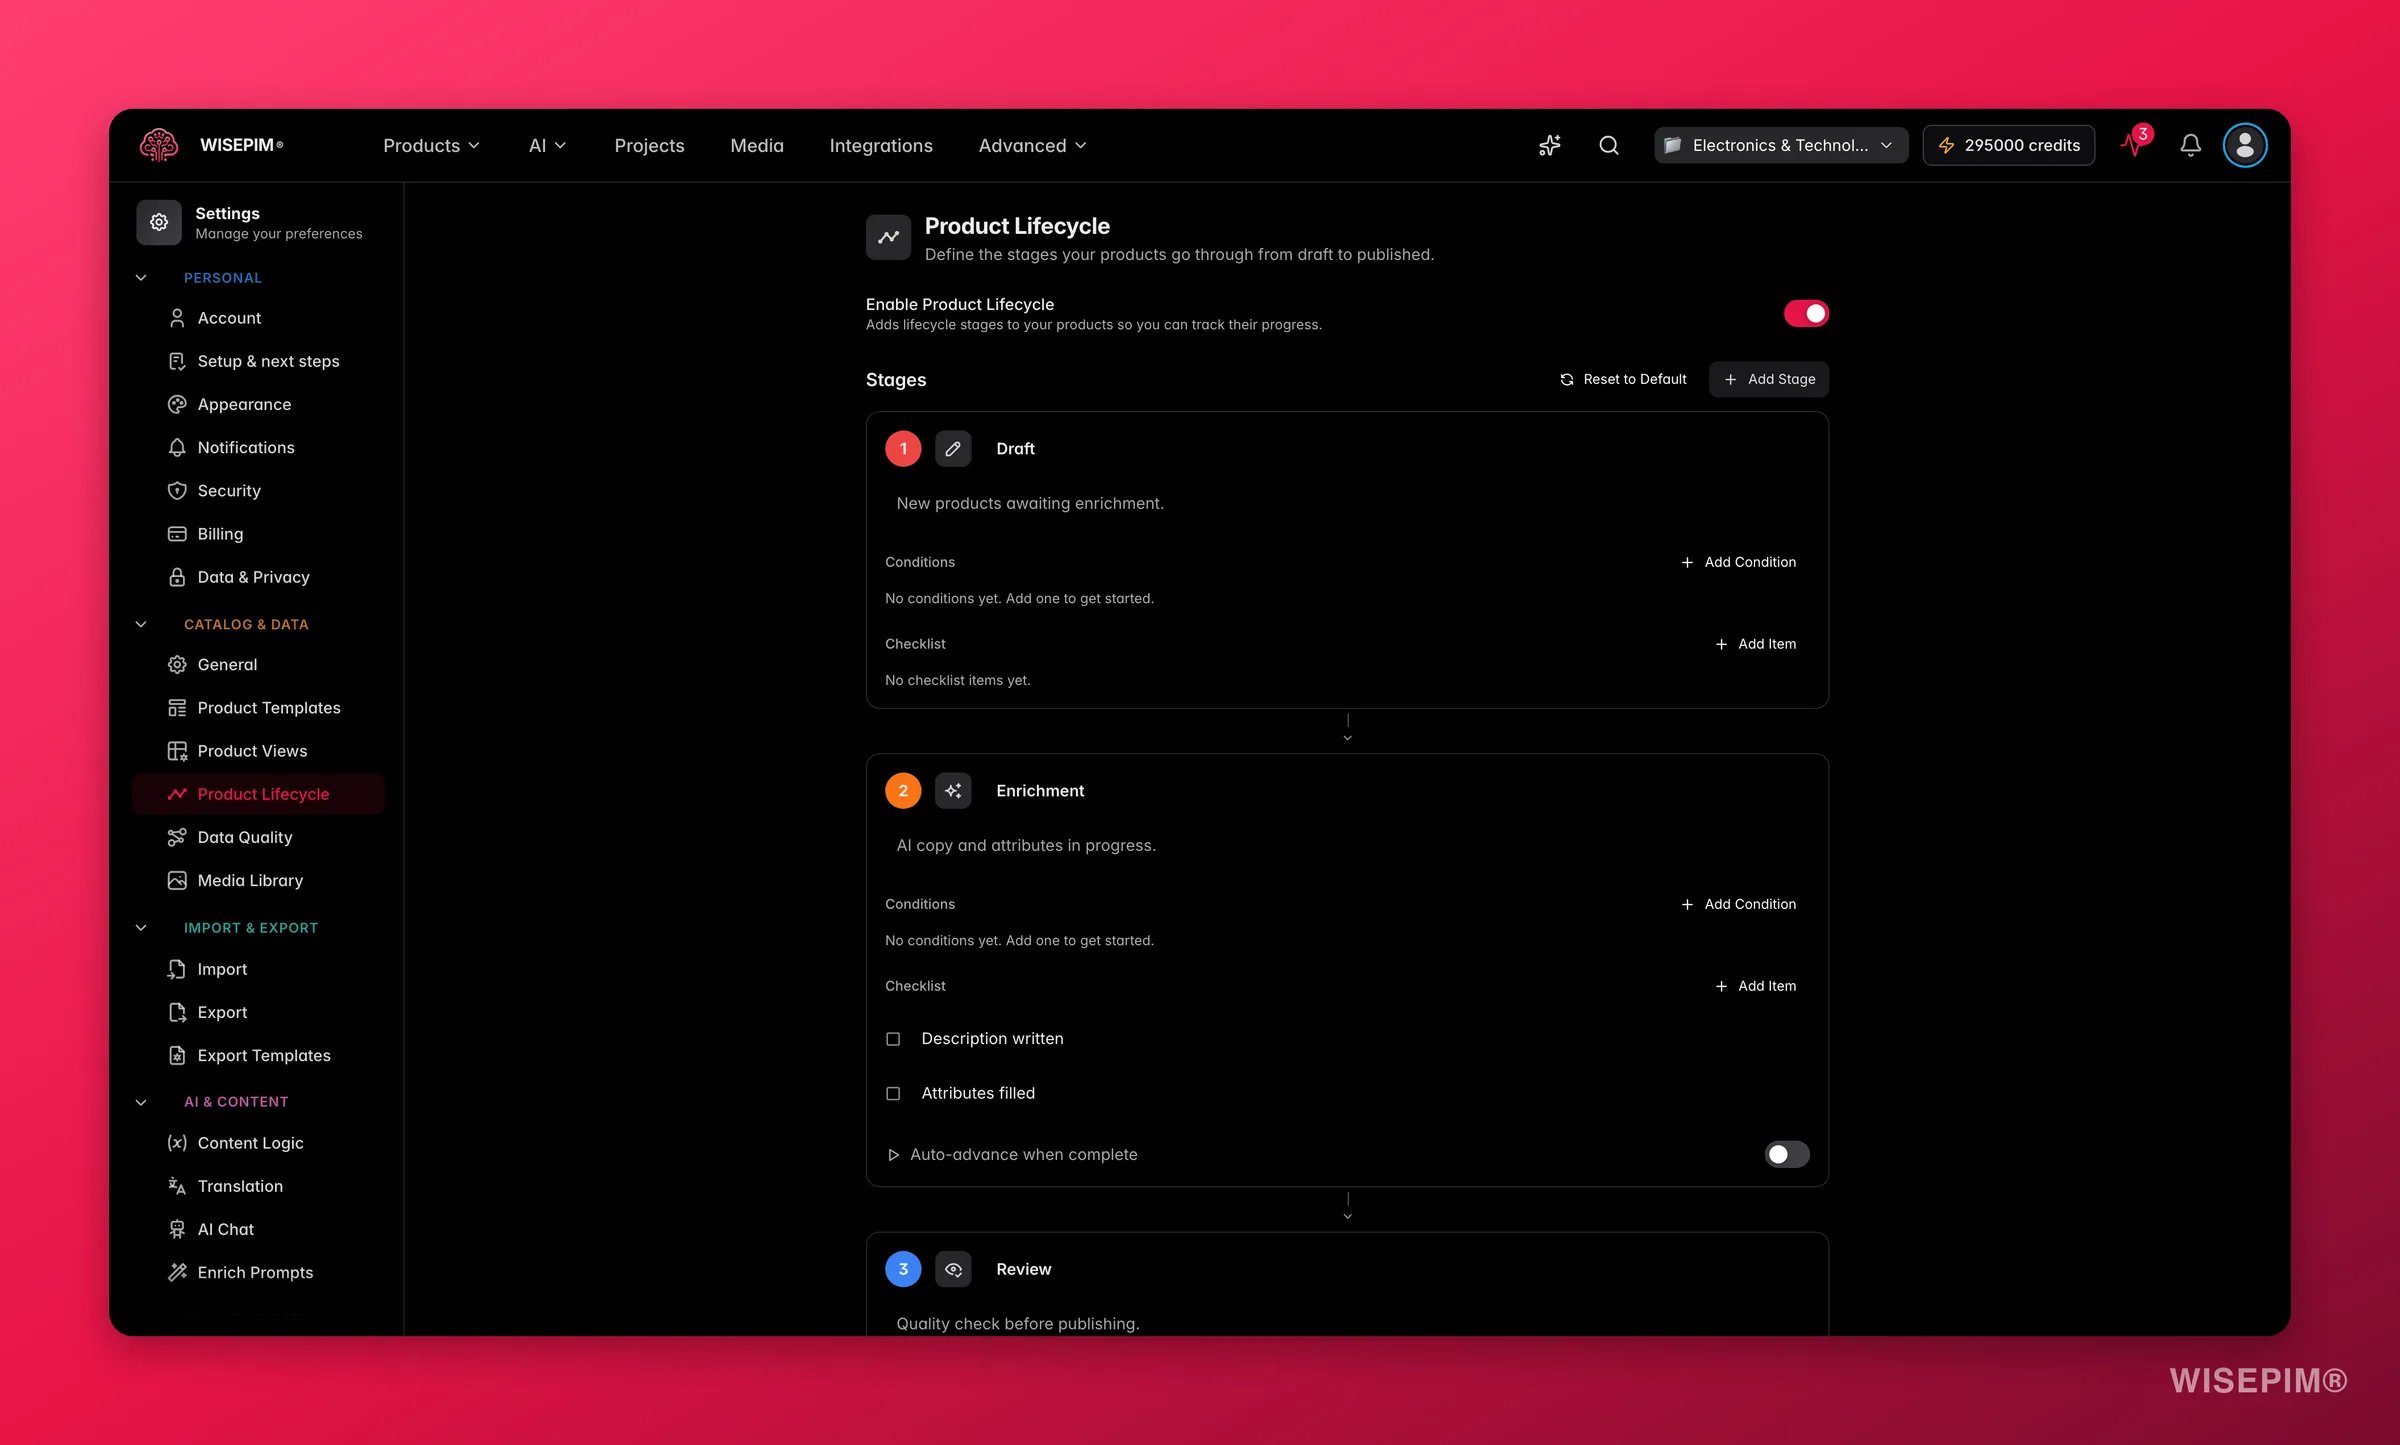
The Product Lifecycle feature lets you define the stages your products move through, from raw data to published, sellable items. Each product shows its current stage at a glance, so your team always knows what is done and what still needs work.
The lifecycle is set up per project. Go to **Settings > Product Lifecycle** to configure your stages.
## Why use lifecycle stages
 Know instantly which products are drafts, in review, approved, or published. No guessing.
Every product follows the same repeatable steps, so nothing gets published before it is ready.
Add requirements and checklists per stage. Products cannot advance until they pass.
Stages connect to [Workflows](/en/workflows/overview), so guided processes can move products forward.
## Enable the lifecycle
Go to **Settings > Product Lifecycle**. Make sure a project is selected in the project switcher.
Flip the **Enable Product Lifecycle** switch at the top of the page.
The stage editor appears. Here you add, edit, reorder, and remove stages.
WISEPIM starts you off with two default stages:
| Stage | Color | Purpose |
| ---------------- | ----- | ------------------------------ |
| **Not Reviewed** | Red | Products not yet reviewed |
| **Reviewed** | Green | Products reviewed and approved |
Customize these or replace them with your own. Click **Reset to Default** anytime to restore the originals.
## Build your stages
### Add a stage
Click **Add Stage**, at the top of the stage list or the bottom of the pipeline. A new stage appears with default settings you can edit right away.
### Edit a stage
Each stage card lets you set:
* **Name**: a clear label, like "Draft", "Content Review", or "Ready to Publish".
* **Color**: one of eight options (blue, green, yellow, purple, red, orange, cyan, pink) to tell stages apart.
* **Icon**: one of 28 icons, grouped into five categories: Content & Creation (7), Review & Approval (6), Product Data (4), Publishing & Sales (7), and Maintenance (3).
* **Description**: an optional note on what happens in this stage.
Pick colors that show progress at a glance. Red for early stages that need work, yellow for in-progress, green for done.
### Reorder stages
The order of your stages is the order of your pipeline. Hover over a stage card and use the **up and down arrows** to move it.
### Delete a stage
Hover over a stage card and click the **trash icon**. Any products in that stage will need to be moved to another one.
Deleting a stage cannot be undone once you save. Check that no important products are assigned to it first.
## Set quality gates
Quality gates stop a product from advancing until it is ready. You build them from automatic **requirements** and manual **checklists**.
### Add requirements
Requirements are conditions a product must meet to enter or stay in a stage. Find the **requirements section** inside each stage card.
Click **Add Condition** in the stage's requirements area.
Choose which product attribute to check. The list covers every attribute in your project: built-in fields like description, price, and EAN, plus any custom attributes from **Settings > Product Attributes**.
Pick how to evaluate the field:
| Operator | Meaning |
| ----------------------- | -------------------------------- |
| `equals` | Exact match |
| `not_equals` | Does not match |
| `contains` | Field includes the value |
| `not_contains` | Field does not include the value |
| `starts_with` | Field begins with the value |
| `ends_with` | Field ends with the value |
| `greater_than` | Numeric comparison |
| `less_than` | Numeric comparison |
| `greater_than_or_equal` | Numeric comparison |
| `less_than_or_equal` | Numeric comparison |
| `in_list` | Value is one of a set |
| `is_empty` | Field has no value |
| `is_not_empty` | Field has a value |
| `is_true` | Boolean check |
| `is_false` | Boolean check |
Enter the value to compare against. Operators like "is empty" need no value.
With more than one condition, choose whether **all** must pass (AND) or **any** one is enough (OR).
For example:
* **Ready to Publish** requires: description is not empty AND quality score is greater than 75 AND main image exists.
* **Content Review** requires: description is not empty OR short description is not empty.
### Add a checklist
Some checks need a human eye, like confirming photo quality or supplier pricing. Each stage can hold a manual checklist for these.
Click **Add Item** in the stage's checklist section.
Write a clear, actionable item, like "Verify all images are at least 1000x1000px".
Repeat for every manual check that belongs in this stage.
Pair automatic requirements with manual checklists for a thorough gate. Requirements catch data issues; checklists catch what only a person can judge.
### Advance products automatically
When a stage has requirements or checklist items, you can turn on **auto-advance**. Products that meet every requirement then move to the next stage on their own, with no manual step.
To enable it:
1. Make sure the stage has at least one requirement or checklist item.
2. Flip the **Auto-advance when complete** switch at the bottom of the stage card.
Auto-advance only appears once a stage has a quality gate. This stops products from skipping ahead in stages with no checks.
## Example setups
Not sure how to structure your pipeline? Start from one of these.
Best for small teams that just need a basic review step.
1. **Not Reviewed** (Red): awaiting initial review.
2. **Reviewed** (Green): checked and approved.
For teams preparing products for online stores.
1. **Draft** (Blue): raw data, just imported or created.
2. **Content Enrichment** (Yellow): descriptions and attributes being written or AI-enriched.
3. **SEO Review** (Orange): meta titles, descriptions, and keywords being optimized.
4. **Quality Check** (Purple): final review against your quality standards.
5. **Ready to Publish** (Green): approved and ready to export to your webshop.
6. **Published** (Cyan): live on your sales channels.
For teams launching products across several markets.
1. **Data Collection** (Blue): gathering specs and images.
2. **Content Creation** (Yellow): writing descriptions in the primary language.
3. **Translation** (Purple): translating to all target languages.
4. **Legal Review** (Orange): compliance and regulatory checks.
5. **Approved** (Green): ready for all markets.
6. **Archived** (Red): discontinued or seasonal products.
## Save your changes
WISEPIM tracks every change you make: adding stages, editing names, reordering, deleting, and toggling the feature. A save bar appears at the bottom of the page whenever you have unsaved changes.
* Click **Save** to store your whole configuration at once.
* Click **Undo** to revert **all** changes since your last save, restoring the server's exact state.
* A loading indicator shows while the save runs.
Undo reverts everything at once. There is no partial undo. To keep some changes and drop others, save first, then make more edits.
Lifecycle changes affect every product in the project. Check with your team before reshaping the pipeline.
## Use stages on products
Once your stages are set up, they appear in the **Products table**. Each row shows a **lifecycle stage selector** with the product's current stage, icon, and color.
To change a product's stage:
1. Find the product in the table.
2. Click its lifecycle stage indicator.
3. Pick the new stage from the dropdown. Each option shows the name, icon, and color.
4. The stage updates right away.
You can also filter by stage. Open **Advanced Filters** in the products table, and a review filter appears that narrows products by their current stage.
The lifecycle column adjusts its width to your stage names, so they stay readable without wasting space.
## Related
Run guided processes that find, fix, and move products through your stages.
Define the fields your stage requirements can check against.
Know instantly which products are drafts, in review, approved, or published. No guessing.
Every product follows the same repeatable steps, so nothing gets published before it is ready.
Add requirements and checklists per stage. Products cannot advance until they pass.
Stages connect to [Workflows](/en/workflows/overview), so guided processes can move products forward.
## Enable the lifecycle
Go to **Settings > Product Lifecycle**. Make sure a project is selected in the project switcher.
Flip the **Enable Product Lifecycle** switch at the top of the page.
The stage editor appears. Here you add, edit, reorder, and remove stages.
WISEPIM starts you off with two default stages:
| Stage | Color | Purpose |
| ---------------- | ----- | ------------------------------ |
| **Not Reviewed** | Red | Products not yet reviewed |
| **Reviewed** | Green | Products reviewed and approved |
Customize these or replace them with your own. Click **Reset to Default** anytime to restore the originals.
## Build your stages
### Add a stage
Click **Add Stage**, at the top of the stage list or the bottom of the pipeline. A new stage appears with default settings you can edit right away.
### Edit a stage
Each stage card lets you set:
* **Name**: a clear label, like "Draft", "Content Review", or "Ready to Publish".
* **Color**: one of eight options (blue, green, yellow, purple, red, orange, cyan, pink) to tell stages apart.
* **Icon**: one of 28 icons, grouped into five categories: Content & Creation (7), Review & Approval (6), Product Data (4), Publishing & Sales (7), and Maintenance (3).
* **Description**: an optional note on what happens in this stage.
Pick colors that show progress at a glance. Red for early stages that need work, yellow for in-progress, green for done.
### Reorder stages
The order of your stages is the order of your pipeline. Hover over a stage card and use the **up and down arrows** to move it.
### Delete a stage
Hover over a stage card and click the **trash icon**. Any products in that stage will need to be moved to another one.
Deleting a stage cannot be undone once you save. Check that no important products are assigned to it first.
## Set quality gates
Quality gates stop a product from advancing until it is ready. You build them from automatic **requirements** and manual **checklists**.
### Add requirements
Requirements are conditions a product must meet to enter or stay in a stage. Find the **requirements section** inside each stage card.
Click **Add Condition** in the stage's requirements area.
Choose which product attribute to check. The list covers every attribute in your project: built-in fields like description, price, and EAN, plus any custom attributes from **Settings > Product Attributes**.
Pick how to evaluate the field:
| Operator | Meaning |
| ----------------------- | -------------------------------- |
| `equals` | Exact match |
| `not_equals` | Does not match |
| `contains` | Field includes the value |
| `not_contains` | Field does not include the value |
| `starts_with` | Field begins with the value |
| `ends_with` | Field ends with the value |
| `greater_than` | Numeric comparison |
| `less_than` | Numeric comparison |
| `greater_than_or_equal` | Numeric comparison |
| `less_than_or_equal` | Numeric comparison |
| `in_list` | Value is one of a set |
| `is_empty` | Field has no value |
| `is_not_empty` | Field has a value |
| `is_true` | Boolean check |
| `is_false` | Boolean check |
Enter the value to compare against. Operators like "is empty" need no value.
With more than one condition, choose whether **all** must pass (AND) or **any** one is enough (OR).
For example:
* **Ready to Publish** requires: description is not empty AND quality score is greater than 75 AND main image exists.
* **Content Review** requires: description is not empty OR short description is not empty.
### Add a checklist
Some checks need a human eye, like confirming photo quality or supplier pricing. Each stage can hold a manual checklist for these.
Click **Add Item** in the stage's checklist section.
Write a clear, actionable item, like "Verify all images are at least 1000x1000px".
Repeat for every manual check that belongs in this stage.
Pair automatic requirements with manual checklists for a thorough gate. Requirements catch data issues; checklists catch what only a person can judge.
### Advance products automatically
When a stage has requirements or checklist items, you can turn on **auto-advance**. Products that meet every requirement then move to the next stage on their own, with no manual step.
To enable it:
1. Make sure the stage has at least one requirement or checklist item.
2. Flip the **Auto-advance when complete** switch at the bottom of the stage card.
Auto-advance only appears once a stage has a quality gate. This stops products from skipping ahead in stages with no checks.
## Example setups
Not sure how to structure your pipeline? Start from one of these.
Best for small teams that just need a basic review step.
1. **Not Reviewed** (Red): awaiting initial review.
2. **Reviewed** (Green): checked and approved.
For teams preparing products for online stores.
1. **Draft** (Blue): raw data, just imported or created.
2. **Content Enrichment** (Yellow): descriptions and attributes being written or AI-enriched.
3. **SEO Review** (Orange): meta titles, descriptions, and keywords being optimized.
4. **Quality Check** (Purple): final review against your quality standards.
5. **Ready to Publish** (Green): approved and ready to export to your webshop.
6. **Published** (Cyan): live on your sales channels.
For teams launching products across several markets.
1. **Data Collection** (Blue): gathering specs and images.
2. **Content Creation** (Yellow): writing descriptions in the primary language.
3. **Translation** (Purple): translating to all target languages.
4. **Legal Review** (Orange): compliance and regulatory checks.
5. **Approved** (Green): ready for all markets.
6. **Archived** (Red): discontinued or seasonal products.
## Save your changes
WISEPIM tracks every change you make: adding stages, editing names, reordering, deleting, and toggling the feature. A save bar appears at the bottom of the page whenever you have unsaved changes.
* Click **Save** to store your whole configuration at once.
* Click **Undo** to revert **all** changes since your last save, restoring the server's exact state.
* A loading indicator shows while the save runs.
Undo reverts everything at once. There is no partial undo. To keep some changes and drop others, save first, then make more edits.
Lifecycle changes affect every product in the project. Check with your team before reshaping the pipeline.
## Use stages on products
Once your stages are set up, they appear in the **Products table**. Each row shows a **lifecycle stage selector** with the product's current stage, icon, and color.
To change a product's stage:
1. Find the product in the table.
2. Click its lifecycle stage indicator.
3. Pick the new stage from the dropdown. Each option shows the name, icon, and color.
4. The stage updates right away.
You can also filter by stage. Open **Advanced Filters** in the products table, and a review filter appears that narrows products by their current stage.
The lifecycle column adjusts its width to your stage names, so they stay readable without wasting space.
## Related
Run guided processes that find, fix, and move products through your stages.
Define the fields your stage requirements can check against.